
Why I Built an AI Meal Planner
Every Sunday, I do the same thing: open my refrigerator, take inventory of what I have, and plan out the week’s meals. It’s a routine that saves me from the daily “what should I eat?” dilemma. But here’s the catch—even with a plan, I still find myself searching online for recipes every time I’m ready to cook, Which is time-consuming.
That’s when I thought: What if there was a better way?
The idea: A web app where I could input my available ingredients, and AI would generate recipes based on dietary guidelines—not just any recipes, but ones that analyze whether I’m meeting my nutritional needs, especially now that I’m pregnant.
Pregnancy changes everything about meal planning. Suddenly, it’s not just about eating well—it’s about making sure I’m getting enough folate, iron, calcium, and dozens of other nutrients my baby needs. Every meal matters, and I wanted a tool that could help me feel confident that I’m eating right.
So I built an AI-powered meal planner. And in this tutorial, I’ll show you exactly how to build your own—whether you’re pregnant, following a specific diet, or just want to make meal planning easier.
Step-by-Step Tutorial for the AI Meal Planner for Pregnant Women
Step 1: Craft Your Prompt with an LLM
The foundation of any AI application is a well-crafted prompt. But here’s the good news: you don’t have to write the perfect prompt on your first try. Let the AI help you refine it.
Here’s my approach:
- Start a conversation with an LLM (I used Gemini, but Claude or ChatGPT work great too)
- Describe your goal clearly: Tell the AI what you’re trying to build and mention that it’s for AI Studio. For example:“I want to build a meal planning app in AI Studio. The app should take ingredients I already have and generate pregnancy-safe recipes with nutritional analysis based on dietary guidelines.”
- Let the AI ask clarifying questions. This helps your requirements be more complete. The AI might ask:
- Should recipes use ONLY your ingredients, or can it suggest additional ones?
- What dietary guidelines should it follow?
- What nutritional information do you want to track?
- Any dietary restrictions or preferences?
- Refine until you have a complete prompt that captures all your requirements.
Notices ! Don’t limit the AI to only using your available ingredients. That often results in weird, forced recipe combinations. Instead, have the AI use your ingredients as a foundation and suggest complementary ingredients based on nutritional guidelines. This creates realistic, balanced meals.
My final prompt:
Core Functionality:
Pantry Input: A text area for users to list ingredients they have.
Dietary & Health Profile: A text box for allergies, specific diets, or health goals.
Health Compliance (Crucial): All recipes generated MUST adhere to the HK Department of Health guidelines for Healthy Eating During Pregnancy and Breastfeeding (https://www.fhs.gov.hk/tc_chi/health_info/woman/20036.html). Focus on:
High Folic Acid, Iodine, Iron, and Calcium.
Safe food preparation (avoiding high-mercury fish, unpasteurized dairy, etc.).
Balanced portioning for expectant/nursing mothers.
Duration Logic: Two buttons: “1-Day Plan” and “7-Day Plan.”
Output: Generate Breakfast, Lunch, and Dinner (1-3 options per meal).
Each meal must include a concise recipe.
Display a Nutrition Table per day: Calories, Protein (g), Carbs (g), and Fat (g).
Persistence: Use localStorage to save the user’s ingredients and dietary profile so they remain after a page refresh.
Technical Specs:
Stack: Single-file HTML/Tailwind CSS/Vanilla JS or a simple React component.
LLM Integration: Use Gemini API to process the ingredients and guidelines into a structured JSON response.
UI Vibe: Clean, trustworthy, and “medical-lite.” Use a soft palette (warm whites, sage greens, or soft blues).
Ingredient Logic: Hybrid Model. The AI uses the user’s inputs as the primary base but is explicitly authorized to add “Staple Ingredients” (e.g., olive oil, spices, grains) and “Nutritional Essentials” (e.g., leafy greens for folic acid, dairy for calcium) to meet the HK Department of Health standards.
Guideline Priority: If a user’s ingredients are insufficient to meet the health guidelines, the AI must prioritize the guidelines and list the missing items as a “Recommended Add-on.”
Feel free to use this as a reference and adapt it to your needs!
Step 2: Build and Test in AI Studio
Once you have your prompt, it’s time to bring it to life in AI Studio.
- Open Google AI Studio (aistudio.google.com)
- Go to Build, and create a new prompt and paste in your refined prompt
- Test it with sample inputs after the AI completing running – try different ingredient combinations
- Iterate if needed – adjust the prompt based on the outputs
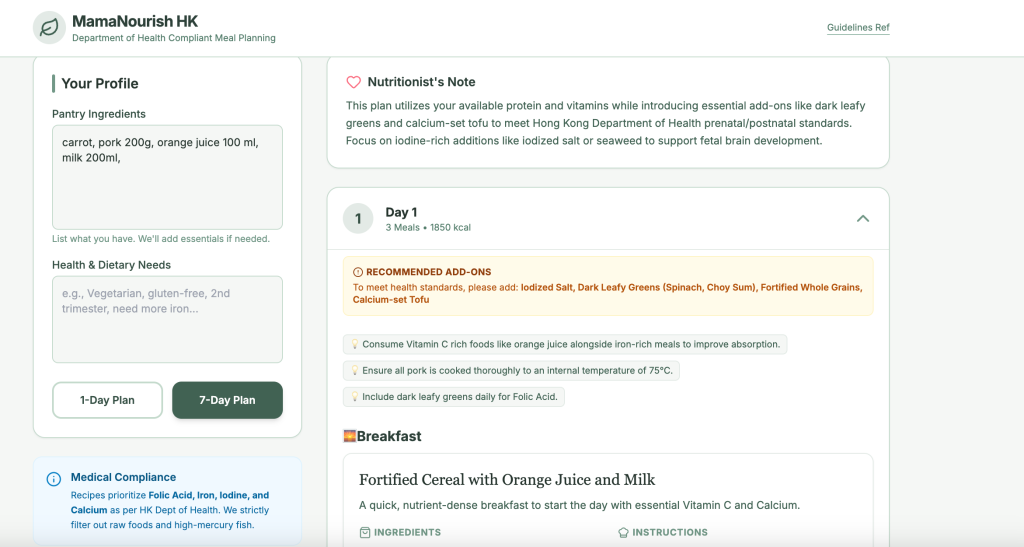
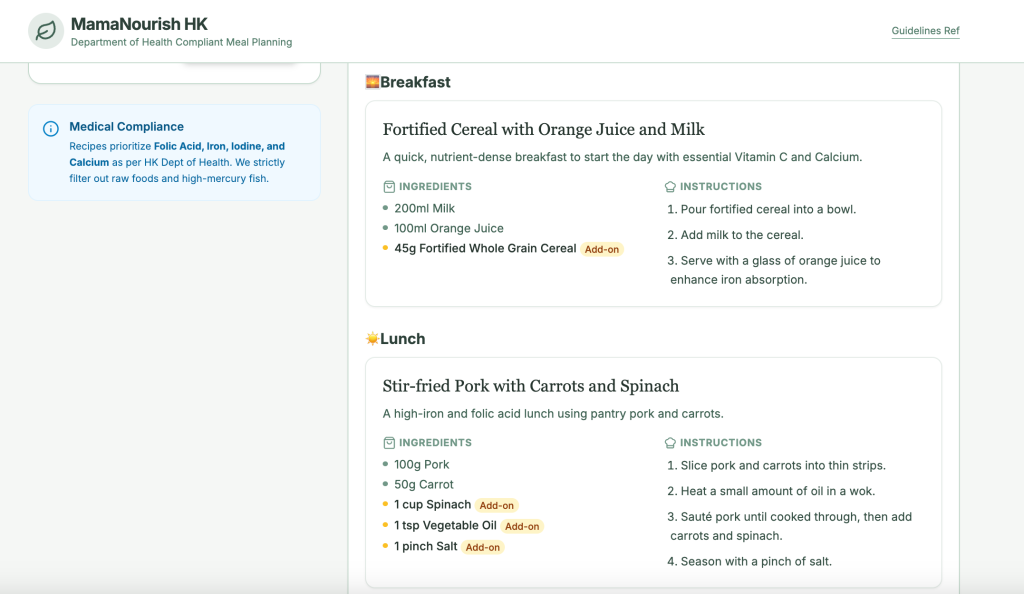
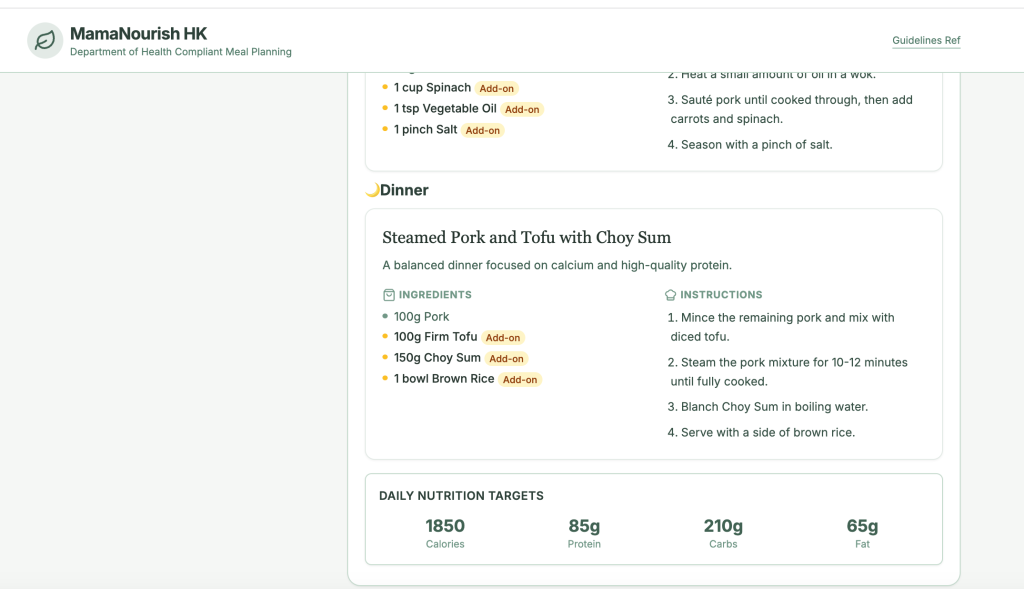
When it’s working smoothly, you’ll see something like this:
Step 3: Run It Locally
Now let’s get this running on your own machine so you can use it anytime, even offline.
What you’ll need:
- A code editor (VS Code, Cursor, or similar)
- A Gemini API key
- Terminal access (I’ll show you the Mac commands, but it works similarly on Windows/Linux)
Step-by-step:
- Download the code from AI Studio
- Click the “Get code” button
- Download the project files
- Open the downloaded file in your code editor
Drag the file into the code editor. - Add your API key
- Find the
.env.localfile - Paste your Gemini API key after “=”:
GEMINI_API_KEY=your_api_key_here - Save the file
- Find the
- Install dependencies and run
Open your Mac terminal and navigate to the project folder:cd path/to/your/project
Install the required packages:npm install
Start the development server:npm run dev - Open in your browser
The terminal will show you a local URL (usuallyhttp://localhost:3000). Open it in your browser, and voilà—your AI meal planner is running locally!
You will see another URL labeled “Network.” Try opening it on your phone while connected to the same Wi-Fi network as your computer—you can then use your AI meal planner on your phone.
More Ideas for Your Meal Planner
Here are some powerful features you can also add:
1. Generate Recipe Images
Make your meal planner more visually appealing by adding AI-generated images of each recipe.
Prompt suggested: A checkbox if they want one rustic home-cooked image generated for each recipe.
Note that AI image generation consumes more AI tokens.
2. Calorie-Specific Meal Plans
Add the ability to generate meal plans based on specific calorie targets. For example:
- 1500 calorie meal plan – for controlled weight management
- 2000 calorie meal plan – standard daily intake
- 2500 calorie meal plan – for higher energy needs
Implementation idea: Add a dropdown or input field where users can specify their target calories. The AI will then generate recipes that, when combined, hit that daily target while maintaining nutritional balance.
3. International Dietary Guideline Links
Different countries have different dietary recommendations. I use HK Department of Health guidelines for Healthy Eating During Pregnancy and Breastfeeding in my planner. But I also collect guidelines from typical countries/regions. Copy them to expand your app to support multiple regions:
Recommended resources:
- USA: USDA Dietary Guidelines 2025-2030
- UK: NHS Eatwell Guide
- Canada: Canada’s Food Guide
- Australia: Australian Dietary Guidelines
- EU: EFSA Dietary Reference Values
- China: Chinese Dietary Guidelines
- Japan: Japanese Food Guide
You could add a country selector in your app and adjust the nutritional recommendations accordingly.
Final Thoughts
Building this AI meal planner has transformed how I approach cooking during pregnancy. Instead of stress and uncertainty, I now have a tool that helps me make informed decisions about what I eat every day.
The best part? You can customize this for any dietary need—whether you’re managing diabetes, following a vegan diet, training for a marathon, or just trying to eat healthier.
Your turn: What features would you add to your AI meal planner? Share your ideas in the comments below!
Happy cooking! 🍳